 |

TotalMix
Part 2: The Hammerfall DSP Mixer - Software, Features,
Operation
»Technical Information
Index

Having introduced the hardware design in the Tech Info
TotalMix:
Hardware and Technology, this Tech Info describes the software aspect.
We have tried to render all functions of the hardware mixer in a simple
and effective way via a practically oriented user interface. See for yourself...
The Concept
As explained in detail in Part 1, TotalMix hardly knows
any limitations. When mixing all channels simultaneously with each other
while being able to mix one channel several times differently onto other
channels, bus and inline structures customarily found on analogue consoles
won't suffice. The mixer surface, however, should of course appear in a
known way in order to shorten the time needed to get used to it. Conventional
designs with batteries of subgroup and routing buttons? With analogy to
analogue consoles, channel routing would be doubled, the master section
would then have 28 subgroup faders. The usual appearance of a mixing console
would still be missing, because TotalMix doesn't have either EQ nor aux
sends - what remains are faders, pan-pots and the many many buttons...
After dismissing numerous concepts, we ended up exactly where the company
Steinberg has been with Cubase for a long time. Actually, the well-known
Cubase mixer is the (almost) perfect answer for unlimited routing possibilities.
And because something (almost) perfect can hardly be done better, TotalMix
looks like a simplified variant of the Cubase mixer (no effects, no inserts
etc.) - anyway, at first sight. Beneath the surface, we have chosen different
ways though, we'll come back to this later. Another important condition
was the maximum size: the whole mixer should fit into a 1024 screen, which
has determined the appearance significantly.
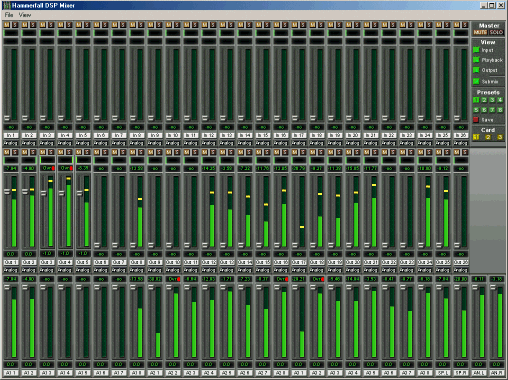
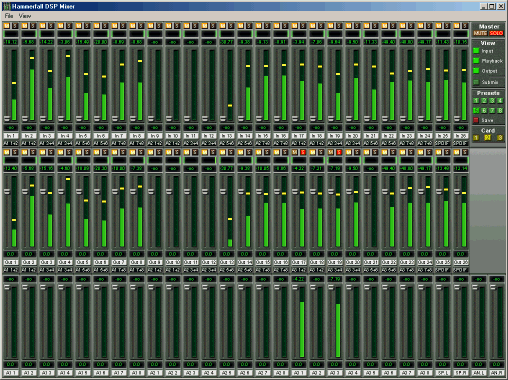
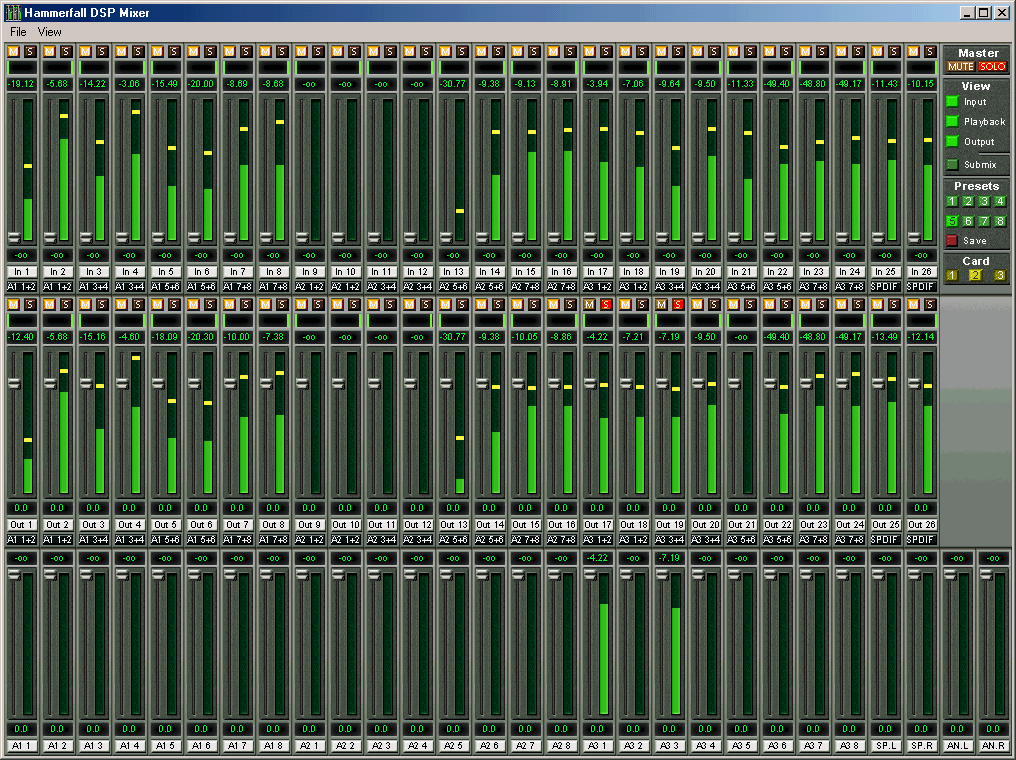
Elements of the Surface
The visible
design of the mixer is mainly determined by the architecture of the
HDSP system:
-
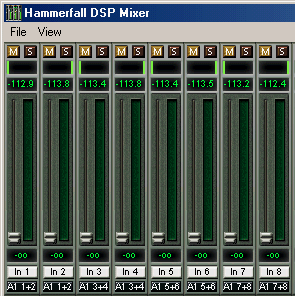
Upper row: hardware inputs.
The level shown is that of the input signal, i. e. Fader independent.
Per fader and routing window, any input channel can be routed and mixed
to any hardware output (third row.)
-
Middle row: playback channels
(playback tracks of the software.) Per fader and routing window, any playback
channel can be routed and mixed to any hardware output (third row.)
-
Lower row: hardware outputs.
Because they refer to the output of a subgroup, the level can only be
attenuated here (in order to avoid overloads), routing is not possible.
This row has two additional channels, the analog outputs.
The two additional outputs in the lower row cause some
free space above on the right side, used for a Quick
Access Panel.
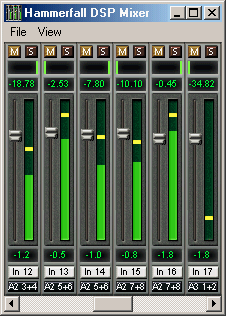
Every
single channel has various elements:
Input and playback channels each have a mute
and solo button.
Below each there is the panpot, realized as indicator bar (L/R) in order to save
space.
In the window below this, the present level is displayed in RMS or Peak, being
updated about every half a second. Overs are indicated here by an additional
red dot.
Then comes the fader with a level meter. The meter shows both peak values (zero
attack, 1 sample is enough for displaying full scale) by means of a yellow line
and mathematically correct RMS values by means of a green bar. The RMS display
has a relatively slow time constant, so that it shows the average loudness quite
well.
Below the fader, the current gain and panorama values are shown.
The white area shows the channel name, the black area shows the current routing
target. |
 |
Tour
de TotalMix
Join us for a Tour de TotalMix, where we will
explain all functions of the surface step by step. Starting up TotalMix,
the last settings are recalled automatically. When executing the application
for the first time, a default file is loaded, sending all playback tracks
1:1 to the corresponding hardware outputs with 0 dB gain. The faders
in the upper row are set to maximum attenuation (called m.a. in the
following), so there is no monitoring of the input channels.
We will now create a small submix for the analogue
headphone output. Please start a multitrack playback and connect
your headphones to the analogue output. In playback channel 1 (labeled
'Out 1'), click onto the routing window below the label. A list pops
up, showing a checkmark in front of '1+2'. Click onto 'Analog'. The
list disappears, the routing window no longer shows '1+2', but 'Analog'.
Now move the fader with the mouse. As soon as the fader value
is unequal m.a., the present state is being stored and routing is activated.
Move the fader button to around 0 dB. The present gain value is displayed
below the fader in green letters. In the lower row, on channels
27 and 28 (AN.L. and AN.R.), you can also see the level of what you
are hearing in the phones. The level meter of the hardware output shows
the outgoing level. Click into the area above the fader and drag
the mouse in order to set the panorama, in this case the routing between
channels 27 and 28. The present pan value is also being displayed
below the fader.
Please carry out the same steps for 'Out 2' now,
in order to route it to the analogue output as well.
Often signals are stereo, i. e. a pair of two channels. It is therefore helpful
to be able to make the routing settings for two channels at once. Press the
Ctrl-key and click into the routing window of 'Out 3' with the key pressed.
The routing list pops up with a checkmark at '3+4'. Click onto 'Analog'. Now,
channel 4 has already been set to 'Analog' as well. When
you want to set the fader to exactly 0 dB, this can be difficult, depending
on the mouse configuration. Move the fader close to the 0 position and now press
the Shift-key. This activates the fine-mode, which stretches the mouse movements
by a factor of 8. In this mode, a gain setting accurate to 0.1 dB is no problem
at all. |
 |
Advanced users will probably have only cross-read this
section, because this implementation is both intuitive and common. But now
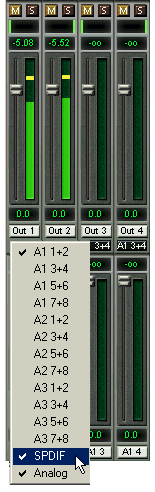
it's getting interesting. Please set 'Out 4' to a gain of around -20 dB
and the pan close to center. Now click onto the routing window. You'll now
see two checkmarks, one at '3+4', the other one at 'Analog'. Click onto
'SPDIF'. The window disappears, fader and panpot jump to their initial values,
the signal can now be routed to the SPDIF output. You can continue, until
all entries have got a checkmark, i. e. you can send the signal to all outputs
simultaneously. This is one of several differences to the Cubase mixer,
which does not allow for multiple selections.
You will certainly have noticed that the headphone mix has not changed,
while you were routing the channel to other outputs and setting different
gain values. With all analogue and most digital mixing desks, the fader
setting would affect the level for every routed bus - not so for TotalMix.
TotalMix allows for setting all fader values individually - a feature owners
of many expensive digital consoles would like to see on their desks. Therefore
the faders and the panpots jump to the appropriate setting as soon as another
routing is chosen.
Back to 'Out 4'. How to get rid of the checkmark, that is to say the routing?
Just by moving the fader to m.a. This setting deactivates the routing...why
route if there is no level?...Click onto '3+4' in the routing window, pull
the fader down, open the routing window again - the checkmark is gone.
Click
here for a larger picture of Submix mode
Such a wide range of possibilities make it difficult to
maintain the overview. Because practically all hardware outputs can be used
for different submixes, as shown. And when opening the routing windows you
might see an army of checkmarks, but you don't get an overview, i.e., how
the signals come together and where. This problem is removed by the (truly
ingenious) view mode 'Submix'. In this mode, all (!) routing windows jump
to the routing pair just being selected. As can be seen in the picture,
you can then see immediately, which channels, which fader and pan settings
make a submix (here 'Analog'.)
Click
here for larger picture of Solo mode
Mute works pre-fader, thus mutes all active routings of
the channel. As soon as any Mute button is pressed, the Master Mute button
lights up in the quick access area. It can switch all selected mutes off
and on again. You can comfortably make mute groups to activate and deactivate
this way. The same holds true for the Solo and the Master Solo buttons.
Solo is working as a solo-in-place. As soon as one Solo button is pressed,
all other Mute buttons are activated and light up. But TotalMix would not
be an Intelligent Audio Solution, if it didn't behave as you'd expect from
a mixing console. If you, for instance, mute 'Out 1' to 'Out 4' and press
Solo for 'Out 5', of course all Mute buttons will light up. If you deactivate
Solo, the Mute buttons for 'Out 1' to 'Out 4' light up as before. And if
you chose Solo for a channel of this Mute group, mute will be deactivated,
but immediately activated again, if Solo is released. Exactly as it should
always be (but hardly anywhere is....)
Hotkeys
TotalMix knows only a few, but very effective key combinations,
that make work (read: setting the mixer up) considerably easier and faster.
The Shift-key for the fine-mode for faders and panpots has already been
mentioned. But the Ctrl-key can do far more than changing the routing pairwise:
-
Clicking anywhere into the
fader area with the Ctrl-key pressed, sets the fader to 0 dB, -6 dB for
the hardware outputs.
-
Clicking anywhere into the
pan area with the Ctrl-key pressed, sets the panorama to <C> meaning
'Center'.
The faders can also be moved pairwise, corresponding
to the stereo-routing settings. This can be achieved by pressing the Alt-key
and is especially comfortable when setting the SPDIF and analogue output
level. At the same time, TotalMix also supports combinations of these keys.
If you press Ctrl and Alt at the same time, clicking with the mouse makes
the faders jump to 0 dB pairwise, and they can be set pairwise by Shift-Alt
in fine-mode.
Also very useful: the faders have two mouse areas.
The first area is the fader button, which can be grabbed at any place without
changing the position. This avoids unwanted changes when clicking onto it.
The second area is the whole fader setting area. Clicking into this area
makes the fader jump to the mouse at once. If you want to set several faders
to m.a. for instance, it is sufficient to click onto the lower end of the
fader path. Which happens pairwise with the Alt-key pressed.
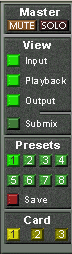
The Quick Access Area...
...really justifies its name. You can find some options
here, which make using TotalMix child's play and almost revolutionize monitoring.
We have already described the Master Mute and Solo buttons, they allow for
group-based working with these functions.
| |
 |
In the View section the single rows can be made
visible or invisible. If the inputs are not needed for a pristine playback
mix, the whole upper row falls out of the picture after a click on the
input button. If the hardware outputs don't interest you either, the
surface can thus be reduced to the playback channels to save space.
All combinations are possible.
Submix sets all routing windows to the same selection as described before.
Deactivating Submix automatically recalls the previous view.
By the way, the mixer can also be made smaller horizontally, and, scrolled.
TotalMix can be made substantially smaller and space-saving on the desktop/screen,
if you have to have to monitor or set only a few channels.
The
Presets are one of the mightiest and most useful features of TotalMix.
Behind the 8 buttons, 8 files are hidden. These contain the complete
mixer state. Just try it: all faders and other settings follow the changing
of preset(s) in real-time, just by a single mouse click. The Save button
allows for storing the present settings in the present preset. You can
change back and forth between a signal distribution, complete input
monitoring and various submixes without any problem. |
Also here, RME's love for details can be seen. If
any parameter is being altered after loading a preset (e. g. moving
a fader), the preset display flashes in order to announce that something
was changed, still showing, which state the present mix is based on.
If no preset button is lit, another preset had been loaded via the File menu
and 'Open file'. Mixer settings can of course be saved the usual way, and with
long file names.
Up to three Hammerfall DSP systems can be used simultaneously.
The Card buttons switch between the systems. Systems, because card 1
can be a Digiface, but card 2 can also be a Multiface.
It remains to mention that the number of ADAT channels is reduced to half automatically
when choosing double speed operation (88.2 or 96 kHz.) The display is adjusted
accordingly, fader settings remain stored via a complex algorithm. |
 |
The Level Meters
Having set a new standard with the level meters of DIGICheck
, we could of course not compromise for Hammerfall DSP. However, this time
the level meters should be realized in hardware, in order to be capable
of using them independent of the software in use. Besides, the CPU load
for calculating the RMS values for 52 channels with a decent display would
not have been unproblematic.
The level meters integrated in TotalMix - considering their size - cannot
be compared with a pure meter bridge (available later.) Nevertheless, we
have integrated all our know-how and many useful functions already here.
Peak and RMS is displayed for every channel. 'Level Meter Setup' makes various
options available:
- Display range 40 or 60 dB
- Peak Hold time adjustable
- Numerical display selectable
either Peak or RMS
- Number of consecutive samples
for Overload display (1 to 15)
- RMS display absolute or
relative to 0 dBFS
The latter is a point often overlooked, but nonetheless
important. RMS shows 3 dB less for sine signals. This is mathematically
correct, but not very reasonable for a level meter. Therefore, we had corrected
DIGICheck's RMS display by 3 dB, a full scale sine signal shows both 0 dBFS
Peak and RMS. This setting also yields directly readable signal-to-noise
values, while other applications (like WaveLab) will show a value 3 dB better
than actual (because the reference is not 0 dB, but -3 dB.)
 |
The value displayed in the text field is independent
of the setting 40/60 dB, it represents the full 24 bit range of the
RMS measurement, thus making possible a SNR measurement 'RMS unweighted',
which you would otherwise need extremely expensive measurement devices
for. An ADI-8 DS connected to the Digiface
will therefore show around -113 dB on all 8 channels.
We are aware
of the fact that this level display might cause some alarm, constantly
bringing the reduced dynamic range of your equipment, maybe of
the whole studio, in front of your eyes. Nice to have everything 24
bit - but still noise and hum everywhere in the range around -90 dB
or worse... sorry, but this is hard reality. The up-side about it is
that TotalMix allows for constantly monitoring the signal quality without
effort. Thus it can be a valuable tool for sound optimization and error
removal in the studio. |
Conclusion
With a file size of only 200 kB (despite all bitmaps, graphic
elements and elaborate functions), TotalMix sets its mark also regarding
the need of resources. We are absolutely sure: TotalMix will make you enthusiastic,
our competitors unsure, and set a new standard even in the area of typical
DSP-based I/O-cards - a standard others will have to compete with. And this
is only version 1.0...
Copyright © Matthias Carstens, 2001.
All entries in this Tech Infopaper have been thoroughly checked, however
no guarantee for correctness can be given. RME cannot be held responsible
for any misleading or incorrect information provided throughout this manual.
Lending or copying any part or the complete document or its contents is
only possible with the written permission from RME.
|

